hudson’s nursery details: part II

Today’s post rounds out the tour of Hudson’s nursery. If you’re getting caught up, you can see more here and here.
animals

The animal prints are from Berkley Illustration on Etsy and are framed in Ikea ribba frames. They were one of the first things I chose for the room. Once I decided on them, Zach got me a couple for various holidays. I was showing them to my team at school, when one of my colleagues realized that she and her husband had been giving one as a gift. She ended up getting the staff to sign it as part of our baby shower gift- such a thoughtful idea!

035We got the bed and dresser at a moving sale- they are Stanley Young America brand. Seriously, the only thing I don’t like about this bed is the fact that we might not be able to find another one if we ever have another peanut sharing this space. For real, if you have one of these beds you want to sell me, let me know.

042

I love the woven texture on the headboard that adds an interesting masculine edge to it, and the light that’s hidden underneath the molding will be perfect for bedtime reading.

030There are two drawers on either side that are the perfect place to stash toys.

067I made the quilt for Hudson’s first Christmas present. I’ll share more details later, but that thing was definitely a labor of love.

068The bigger sham is the Navy Color Frame Standard Sham from Serena and Lily. The smaller one was a birthday gift for Hudson from my dad and his wife- it is the FILL’ER UP Large Applique Monogram Pillow Cover (12X16) by Calicodaisy Handmade on Etsy.

066The bookends are the Menagerie Bookends from Serena and Lily, which were a Christmas present from my dad and his wife. Are you sensing a theme here? Instead of requesting clothes or toys (which we can find at yard sales and can be outgrown) for holidays, we’ve tried to stick with things that Hudson will have for the long haul. We’ll see how long we can get away with this for…

027The rocking chair was mine when I was little. It was used in our living room, so the blue velvet worked at the time. I love how well it works in the room. The vintage Boy Scout backpack was a $3 yard sale find. Of course, no little boy room would be complete without everyone’s favorite mascot watching over him. #wolfpacknation

And there you have it- the scoop on acute little Angle’s humble abode. Hope you’ve enjoyed the tour!

hudson’s room details: part I

Now that you’ve seen a general overview of Hudson’s room, I’ll break things down a little bit. Ready for a photo bombardment? Ok, go:

034The bookcase was made by my great-grandfather. He was a master woodworker, and most people on my dad’s side of the family have pieces of his displayed in their homes. My dad wasn’t using this anymore (he says it was more of a quick, functional piece as opposed to the more artistic things that were his signature), and we happily took it off his hands.  I love that we were able to bring in several family items to Hudson’s room- it helps personalize things a little bit.

I got a bunch of the green metal locker baskets at a yard sale a while back, and was so excited to use them in Hudson’s room. Most of them are stored in his closet for now, but this one fit perfectly on the shelf and was the perfect place to store little by essentials.

053The Donald Duck bank belonged to my gandfather, and the sweet cowboy boots were Zach’s when he was little (apparently he wore them all the time). My mother-in-law recently gave them to us, and I sort of felt I like I won the lottery. I am in love with those little guys! The duck and the boots made perfect bookends for some extra-special books (yes, the title of the one on the end is I Love You, Stinky Face. It’s one of my favorites- total Angle family humor!). The circle cards on the ring are from my shower, and we use them almost every night as we’re putting Hudson to bed.

059

The embroidered alphabet was in my nursery as a baby (my aunt originally made it for my cousin, so it’s made the rounds through our family). The mat and frame used to be lavender (along with everything else in my room), which I remedied with a little spraypaint.014The bumper is from Pottery Barn Kids via Craigslist. My original plan was to skip the bumper altogether because most of what I found seemed to be too “themey”. I loved that this one was boyish while not competing with the other elements in the room.

045

The chair is the Pottery Barn Spencer chair (we got it from the Mitchell Gold+Bob Williams outlet). Yes, white chair. Baby room. So far, so good. The drapes are Pottery Barn Kids Sawyer drapes via Ebay. Lamp from Bed, Bath, and Beyond (from our wedding registry). The paper crane mobile was made by the staff at our school as part of our baby shower. The cranes are made out of book pages. We love it!

050The laundry basket is from Pottery Barn via Craigslist. Hudson loves it- that boy takes his laundry duty pretty seriously. The pouf was a clearance find from Target a while ago, but they brought it back!

015The campaign dresser was a Craigslist find, and I was able to pay the girl I bought it from a little extra to paint it for me (we were in between houses at the time, so she also held it forever- very thankful for that). The green was a risky choice for my neutral-loving ways, but I love how it makes it a little more fun. The panda was a gift from my mother-in-law (she got it at a yard sale we went to together, but I think it’s from World Market). The globe lamp was a $3 yard sale find, and it’s one of the things people always seem to point out. The vintage truck was a gift from a friend from a yard sale we went to together. The books below it were both birthday gifts for Hudson, and they are favorites of ours (Little Blue Truck books).


Part II coming soon!

hudson’s nursery progress

Since there’s been radio silence around here for a while, I thought I owed it to some of you to at least show you some of what we’ve been working on. You may remember that Hudson was living it up in a Pack n’ Play at the foot of our bed for the first 8ish months of his life, but we eventually got our acts together, and now the little man has a bona fide space of his own.

Just to jog your memory, here’s what we started with:

106


Nice, right? I mean, what little boy wouldn’t love moldy floral wallpaper and zillions of electrical cords? The blue office carpeting was also especially cozy.

Obviously, the wall situation needed to be addressed. We started by paying a friend’s high school son to rip down the wallpaper (we were in the middle of a million other projects, and had our fill of wallpaper removal at our last house). Also, given the fact that we really wanted to get the mold situation taken care of correctly, we decided to have this room professionally painted. We went with Sherwin Williams’ Westhighland White, which is also our trim color. I love that it’s a really crisp white. I wanted something clean and bright for this room, and this color worked out perfectly.

When I was putting a plan together for the nursery, I kept coming back to primary colors (stay with me here, I don’t mean I was going for a McDonalds playspace look). While I’ve seen tons of sweet boys rooms done in softer tones, the rest of our house has plenty of white, gray, and light blue, and I loved the idea of making Hudson’s room unique. The fun thing about bedrooms is they don’t necessarily have to “go” with the rest of the house, so they’re a great opportunity to try something different. So, here’s where we are now:

010 012 013 063

027 032We love that all the bedrooms in this house are extra big, and since it’s right off our main living area, we can use Hudson’s room like a playroom. We have had so much fun with him in here already! As always, there are still a few things to do (closet  doors?), but the peanut doesn’t seem to mind. I’ll share a few close-ups and give you the details in  the next post.

that time we finished a project and i actually blogged about it

We have loved getting things done around here and making this place feel more like us. However, it feels like lately that free time becomes an either/or decision as far as getting things done or blogging about them are concerned. Thankful for friends on Instagram who kicked me into gear a little bit!

You may have noticed in the kitchen photos, that we’ve been living with a giant patch of spackled wall over the peninsula for…a long time. Before it was a spackle patch, it was a hole where the wiring from the old cabinetry was located, and before it was a hole, it was this:

104

When Zach and I were at a local stone retailer looking at countertops, we both loved the barnboard look of one of the displays. When we talked with one of the designers there, she mentioned that it had been made with old pallet boards and that it had been a relatively simple process. Of course, once we found out that it had the trifecta of cute, cheap, and easy, we were sold.

We mentioned to my dad that we were wanting to do a pallet accent wall in our kitchen, so when he and his wife saw some at a jobsite in their neighborhood, they asked if they could take a few for us. My dad did us a favor by disassembling the pallets before bringing them to us, making our job even easier. We ended up needing one more, and thankfully we had a couple on hand from the big shipment of flooring and other home improvement stuff last summer.

The only part of this project that we had to shell out money for was a quart of black paint. When we talked to the designer, she told us that the installers had painted the wall black before hanging the boards. That way, any gaps caused by irregularities in the boards wouldn’t stick out like a sore thumb. If you’re considering this project for yourself, I highly recommend this step. Tiny cracks are inevitable, and it really helps everything to look more polished. Also, since the sides of our wall are open, I decided to stop the paint a little bit back from the edge to avoid sloppy corners.One nice thing as far as the budget is concerned is that we were able to go with the cheapest paint. Since it’s hardly visible and won’t receive any wear and tear, we didn’t have to worry about quality.

007

Installation of this project was so exciting because it was one of the fastest, most visual projects we’ve done in a while, which was so much fun! Zach hung everything while Hudson and I supervised. He used a nail gun to secure everything, and checked to make sure each board was level before hanging it. On the off chance that one of the boards wasn’t level after being hung, he was happy to discover that the 1.25″ brads were pretty forgiving as far as ripping it out and reattaching it went.

We love the warmth and character that the wood brings to the kitchen area. Definitely worth the effort!

024 020

We were also so excited to see how well it tied in with the tone of the dining room table.

021

The new wall also makes the view from the living room a little more fun.

023

You also may have noticed the new light fixtures that my studly husband hung. The fact that he wired for these himself (as opposed to just swapping out existing fixtures) is just another picture of how he’s challenged himself and improved his skills with this house. So proud of that guy!

026

As far as the fixtures go, we’re really happy with how they turned out. I considered going with different styles over the table and peninsula, but since everything is so open and relatively close, I thought it looked better to use things that coordinated with each other. We went with two Allen + Roth 12″ w Edison Style Mission Bronze pendant lights over the peninsula and the Allen + Roth 36″ w Edison Style 3 Light Mission Bronze Island Light over the table. I think the price has gone up on the pendants since we got them, but they’re still a pretty affordable option, and we’ve been really happy with them. We love the toned-down mood lighting of the Edison bulbs, but our lights are located in areas that are more about dining, less about eating. If you’re looking for task lighting, you’ll probably need to switch out the bulbs.

It’s so much fun to watch this space come together step by step. I’m looking forward to sharing more of our progress with you!

baby’s first birthday

Hudson’s birthday was several weeks ago, but I keep having to remind myself that he’s actually ONE. Zach keeps trying to tell me that the little person walking around our house is a toddler, not a baby, to which I, like basically every mom in the history of ever, reply, “Umm no. He will always be my baby.” (Sing it, Mariah.)

Despite the fact that I was a little nostalgic about my little peanut growing up, I loved getting to celebrate his birthday with family and friends. I had so much fun, in fact, that I somehow managed to not take a single picture during his party. Thankfully, my much-more-photographically-skilled-than-I-am mother-in-law captured everything so well! Today, I thought I’d share some of her shots with you.

First, a little backstory: each year, our town hosts a fireworks celebration on the 3rd of July. This past year, since we were fairly confident that we would be able to see the fireworks from our house (we could), Zach and I decided that it would be fun to host a party for some families from our church. After our list of people we wanted to invite kept growing, we decided just to invite the whole church. Eight weeks after we moved into the basement of a house that was looking like this. Yes, it was as insane as it sounds. Thankfully, by the grace of God, it went amazingly well, and people haven’t stopped asking if we’re having another one. As a result, we’re planning on the 3rd of July shindig being an annual event.

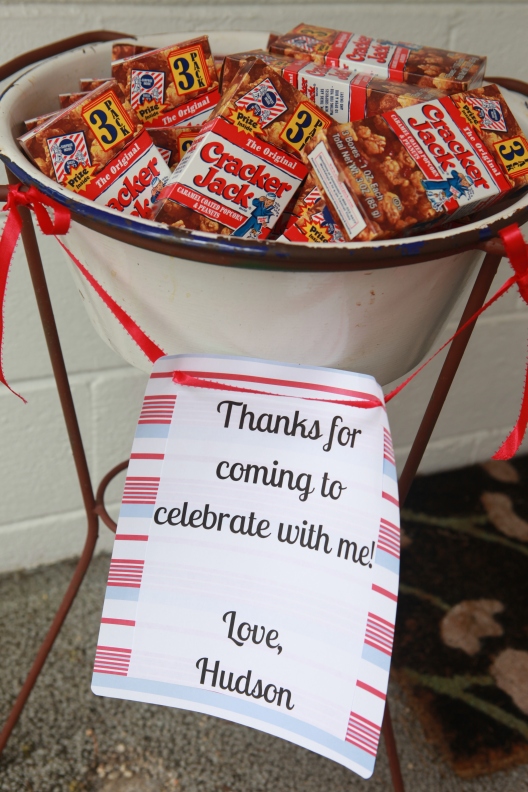
All that to say, I decided to go with a color scheme of red and blue for Hudson’s party because I could reuse most of the decorations for several years. Oh, and also because it’s cute.

Aside from red and blue, the only other goal I had in mind while planning the party was to make it as stress-free as possible. I didn’t want to be working myself ragged and get to a point where I couldn’t relax and enjoy such a special day.

So, here you go: Hudson’s Red and Blue, Low-Stress, First Birthday Party:

The banners:

IMG_0129

IMG_0128
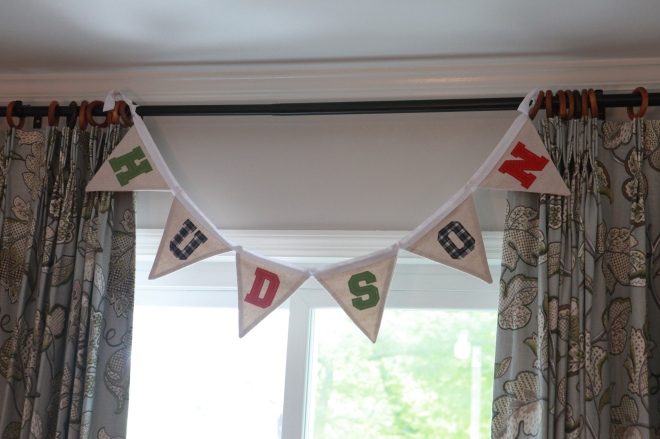
I made the bunting about a month before the party because I anticipated it being somewhat time-consuming, and I wanted to be able to work on it a little bit at a time. Thankfully, it ended up being pretty easy. I looked at several tutorials online, but none of them were quite what I was envisioning, so I came up with this. To be honest, I really love it. Hudson seemed to like it too- I hung it up on his actual birthday, and he kept pointing at it and babbling- love that boy. Most of the fabrics were scraps from his Christmas present, so it was pretty inexpensive, and I’m hoping to use it for his birthday for several years.
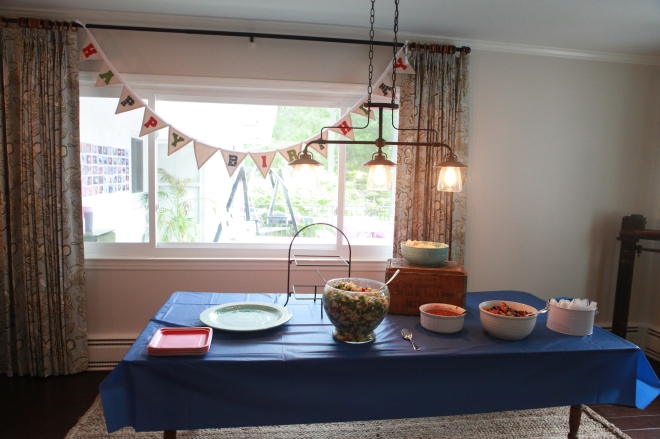
The food:

IMG_0185 IMG_0186 IMG_0188 IMG_0136
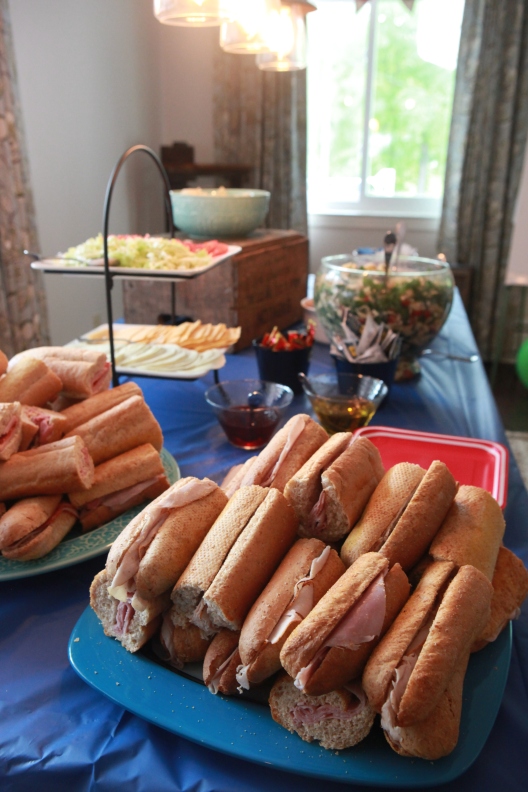
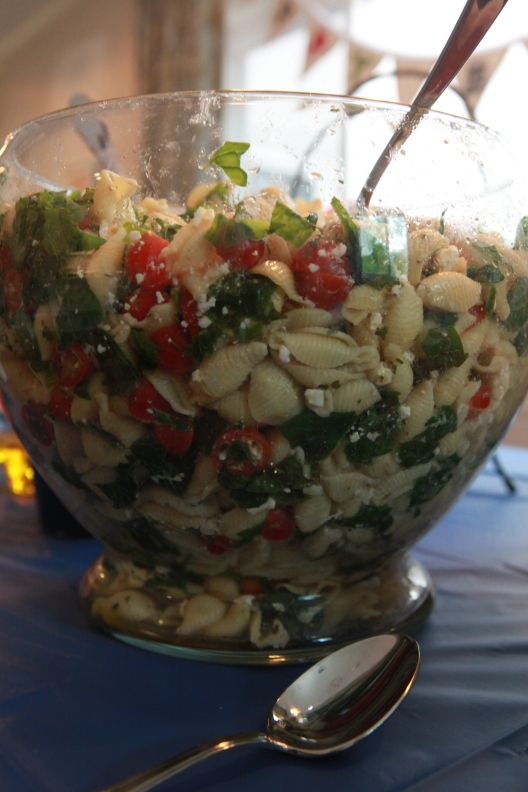
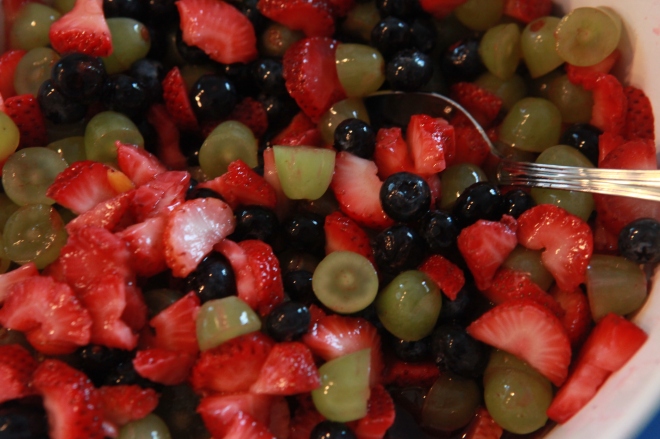
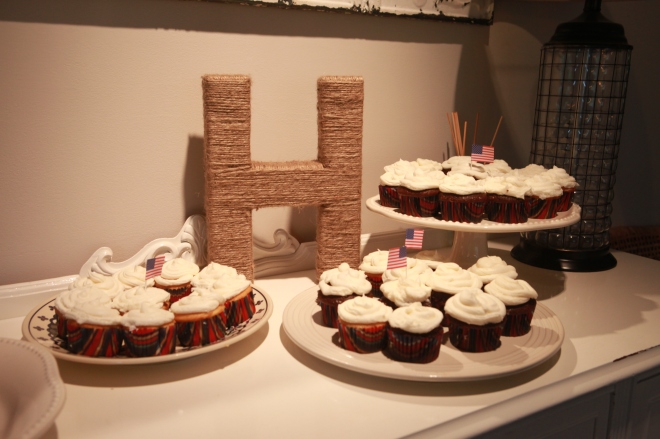
Again, the idea was to keep it simple. I opted for things that I could make ahead of time, because the idea of guests arriving while I got things out of the oven and scrubbed dishes sounded a little nightmareish. We went with pasta salad, fruit salad, Pioneer Woman’s salsa and chips, and subs from the grocery store. Our local grocery store does a $5 footlong deal that includes all the toppings on the side, and if you cut them into thirds (you can see from the picture that they were still a great size), it’s a really reasonable price for very little effort. Zach’s mom made all of the cupcakes the day before, which was such an amazing help. They were a hit! I overestimated the food needs a little bit, but I was definitely in the “I’d rather have too much than too little” frame of mind. Plus, we had delicious leftovers!

The decorations:

IMG_0154 IMG_0153 IMG_0155 IMG_0164
IMG_0152IMG_0160IMG_0148

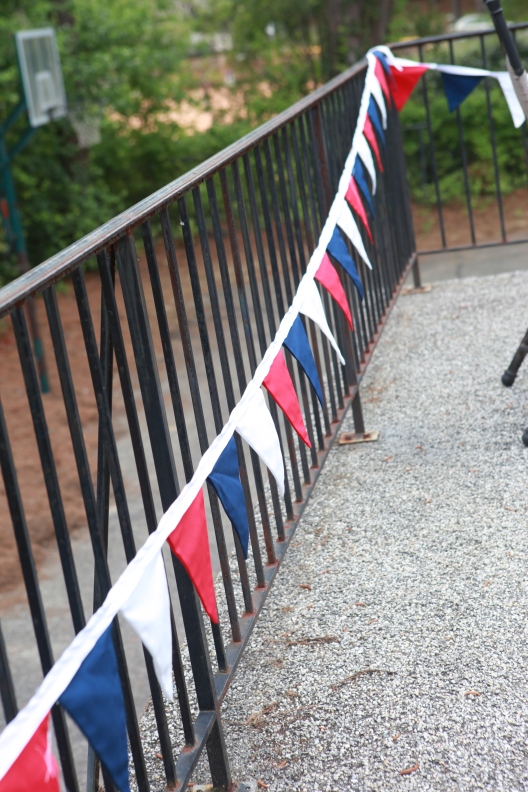
The bunting was the main thing I had in mind to reuse when going with the red and blue theme- I’m hoping we’ll get lots of 4th of July use out of it over the coming years.

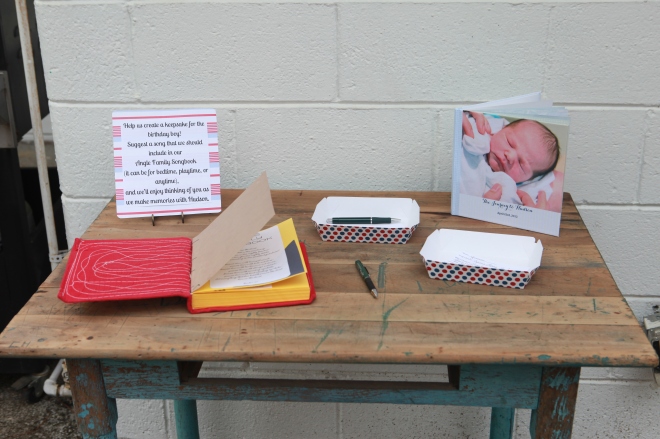
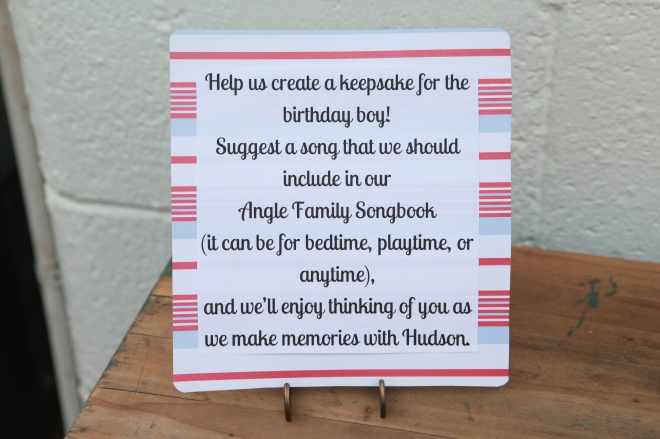
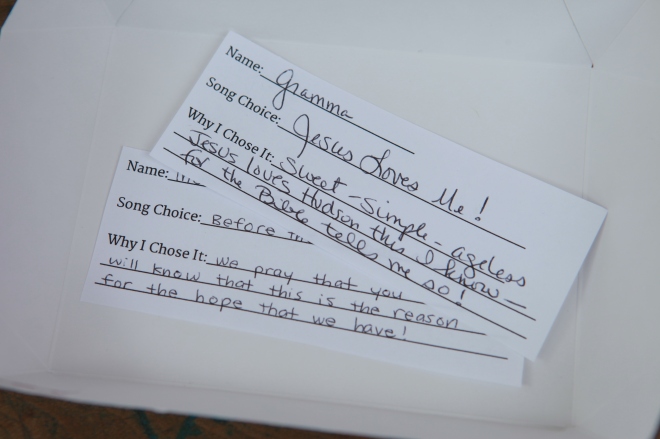
I bought the red journal at a handmade market when we were in London on our honeymoon, and have been wanting to put it to good use. It was fun to see which songs guests chose and how their choices reflected their personalities.

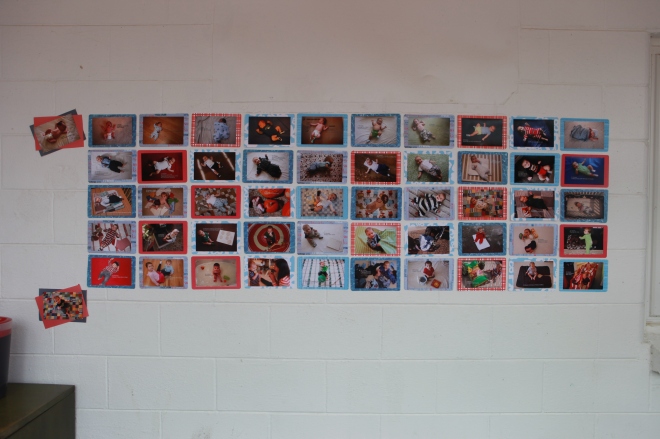
I backed Hudson’s weekly photos in paper I had leftover from my scrapbooking days (so thankful for digital albums), and we hung them on the wall. They were probably the highlight of the party- I mean, who can resist cute baby pictures?

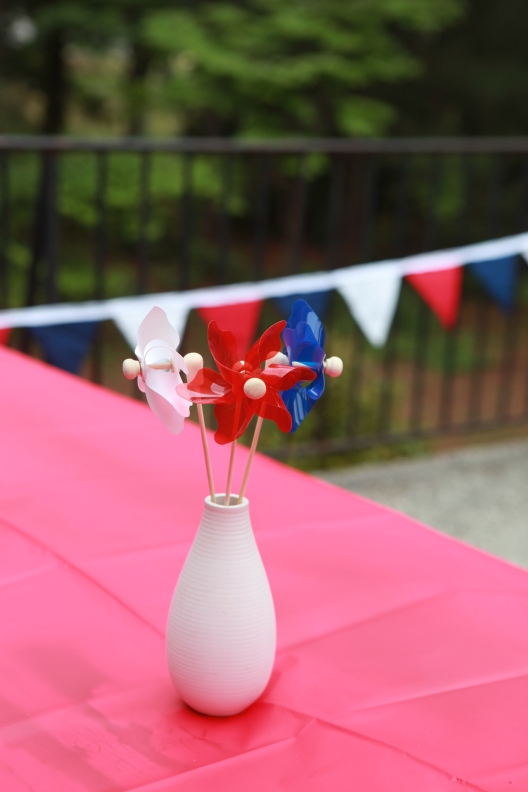
The pinwheels came in packs of three from the dollar store and ended up being the perfect table toppers- inexpensive, simple, and a hit with the kids!

One bonus of the color scheme was that we ended up having lots of things in the house that worked for accessories- blue and white enamelware, our distressed table, and our runner all helped bring everything together.

It was so much fun to put everything together and celebrate one of my favorite people! I’ll hopefully share another short birthday post so you can see how the man of the hour enjoyed his first party!

basement progress

Alternate post title: that time we finished the basement and then I forgot to blog about it. So yeah. The basement has been up and running for several months now, but in the general bustle of life, it keeps slipping my mind to do a blog update. In case you need a reminder, we started with this colorful crazytown: 035The hilarious thing is, I’m not even sure this picture does justice to the madness. It appears much cleaner in this picture than it actually was. No, seriously. There’s a reason that playmat was being stored on top of the chairs, people. You can see more before photos here and here. Now, after replacing the cabinets, ceiling, and lights, coming up with a new floorplan, adding a shower and washer/dryer, and having everything painted, we have this: 034014015019020023 024The kitchen cabinets are much nicer than any of the cabinets we’ve ever had. Divided compartments, lazy susan, spice rack, and hanging storage for utensils…seriously awesome. 025 027 029 026041 032As you might remember, our primary goal in getting the basement finished was so we would be able to rent it out for a while and generate some extra income. We were thrilled that the day we listed it on Craigslist, we were bombarded with a constant stream of phone calls and e-mails from prospective renters. The interest was incredible, and it allowed us to be pretty picky with who we decided to rent to. Our current renter has been in for a couple of months, and things are working out wonderfully. It’s such an awesome testimony to of the Lord’s provision that He led us to a house where we have been able to do this! Of course, we are excited about the idea of someday taking the basement back to use for our family. You know my husband is dreaming of a man cave, and thankfully I think I’ve landed on a plan that’ll make us both happy. What a fun place for us to share with family and friends someday down the road! For now, our little family of three has plenty of space upstairs, so we’re happy to give up the space for a while. We have had so much fun watching the basement come together! Now that it’s done, we’re enjoying working on a few upstairs projects that I’m looking forward to sharing with you!